
Hello World Odyssey - Part 3. 好玩的動態鏈接

# 一、動態鏈接
在前面幾篇,我們講的鏈接都是屬於靜態鏈接(static linking),鏈接(linking)是指讓一隻程式在呼叫函數或使用外部變數時知道要往哪裡找。但是在實際應用中,動態鏈接(dynamic linking) 較常被使用,一個例子就是C語言<stdio.h>中的 printf(),如果系統中所有要對終端輸出字串的程式都把printf的程式碼包含進原始碼再編譯,不僅會浪費磁碟空間(儲存了一大堆printf),程式同時執行時主記憶體也就被很多個 printf 函數所佔用。換句話說,如果鏈接器以靜態鏈接的方式,在記憶體內就會存在很多 printf 的拷貝,那為何不乾脆用一份重複使用就好呢 ?
靜態鏈結,鏈結後的可執行文件存在大量拷貝程式碼,浪費硬碟空間,執行時浪費記憶體
當使用動態鏈結技術時,當使用到 printf 時,才去做動態鏈結到該程式碼區段,去 libc.so 的 printf 的程式碼執行後返回。動態鏈接可以使得多個程式共用函數,進而得到節省記憶體的效果。另外,在程式執行期才做函數地址解析的方法,稱為動態鏈接,也稱為延遲綁定(Lazy binding)。
所以說比較有效率的方式是讓系統的主記憶體只存著一份printf函數,其他所有程式要輸出字串時讓CPU跳到唯一存放printf的地方執行,結束再跳回原來的程式就行了。之所以叫做動態,就是因為程式編譯時,並不會知道所呼叫的函數在哪裡,無法在編譯時「鏈接」,只能在程式從硬碟載入記憶體時動態地在系統的幫助下完成鏈接。
為了保證程式碼重複使用和節省系統資源,在鏈接時,動態鏈接庫的 .rodata section 和 .data section 等是不會被複製到最終生成的可執行檔案中,這些部分會在程序載入的時候複製到記憶體,並做動態鏈接,使原來可執行文件能夠對其中定義的符號正常引用。也就是說在這個時候,可執行檔案的程式碼區段(.text section)中對動態鏈接函式庫包含的符號引用的地址才真正確定下來。另外對動態鏈接還有一個好處,就是在更新函式庫的時候更方便,因為是在執行時才會解析函數地址,所以基本上不用像靜態鏈結一樣重新編譯,直接替換即可。
另外一個容易搞混的名詞是動態載入 ( Dynamic Loading ),動態鏈結是把需要的函式庫在載入時就放進記憶體。那動態載入是利用 dlopen 在執行期間動態載入函式庫到記憶體,兩者的差別是在載入函式庫的時機點。
總結動態鏈接相對於靜態鏈接的優點
- 更新函式庫更方便,不用重新編譯
- 省硬碟、記憶體空間
# 二、兩大主角 - GOT 和 PLT
GOT (Global Offset Table)
GOT存著很多個一樣大小的元素,形成一個table(基本上就是array)。每個元素都是一個指標(所以說32位元機器一個元素4個bytes,64位元就是8個bytes),指向程式所需要的變數或者是函數,也有可能是系統需要的指標。簡單來說,就是一個存指向函數、變數指標的一維陣列。
PLT (Procedure Linkage Table)
PLT存著很多個一樣大小的元素,形成一個table(基本上就是array)。 每個元素都是一小段程式碼 ,第一個元素是公共plt,負責呼叫動態鏈接器。從第二個開始每個元素分別對應到一個動態鏈接的函數,會使用該函數所對應之GOT元素。
以上兩個主角的內容,之後會用 Debugger 搭配 readelf 展示給大家看。
printf 的動態鏈接流程如下
如果寫成 pseudo code ( 感謝 How the ELF ruined Christmas (opens new window) 提供的程式碼 )
int printf@plt(...)
{
        if( 是第一次呼叫 )
        {
                // 找到 printf 地址,將地址更新到 GOT 表,再呼叫 PLT
                _dl_runtime_resolve(elf_info,printf_index);
        }

        else
        {
                // 直接跳到有放 printf 地址的 GOT 表,並跳到該項內 printf 地址執行
                jmp *(printf_got_entry)
        }
}
2
3
4
5
6
7
8
9
10
11
12
13
14
2
3
4
5
6
7
8
9
10
11
12
13
14
由上面所述,你可以發現 GOT 就是快取的功能 ,當 GOT 表沒有地址 (快取沒有命中),就要用動態鏈接器去找地址並更新 GOT 表,那如果有的話就是快取命中。就直接跳到存在 GOT 元素內的函數地址執行。因此,以這個流程來說,第一次解析通常會比較慢,因為 GOT表沒有地址,要呼叫動態鏈接器執行地址解析與GOT更新,但是第二次呼叫相同的函數時,因為GOT表已經有函數地址,直接跳過去函數地址執行就好,所以第一次之後速度會變比較快。
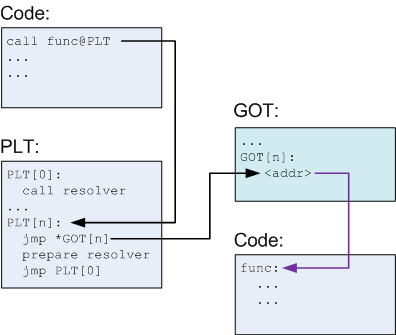
如下圖,下圖左,是第一次 Call function,右是之後 Call 同 function,其實可以發現,當 GOT 若是沒有放該函數地址時,裡面的內容就是 PLT 的下一行指令,之後 PLT 會跳到 PLT 內動態鏈接的索引去執行動態鏈接,這張圖很清楚地涵蓋整個動態鏈接的精華。
另外一張圖,也闡述的蠻清楚的,來自Linux/ELF動態鏈接部分機制(GOT&PLT) (opens new window),需要照數字走
|
- call printf 函數,跳到 PLT[1] (2 的位置)
- PLT[1] 是一段程式碼 ( PLT 內每個元素都是一些跳轉指令 )
- 程式碼第一行先跳到 GOT[2] 的地址,看看 GOT[2] 有沒有存 printf 的地址,結果沒有 printf 的地址, GOT[2]裡面放的是 PLT[1] 下一行程式碼,跳回去 PLT[1] 的下一行程式碼 (4的位置)
- 再跳去 PLT[0] ( 5 的位置 ),因為那裡有動態鏈接器的地址
- PLT[0] 起始地址
- 呼叫動態鏈接器解析函數地址
- 更新 GOT[2] 的內容變成 pritnf 的地址
- 以後,當 call printf 時,去 GOT[2] 找就可以直接跳到 printf 的地址執行
講完了 printf 的故事,那為何需要 PLT 表格 ? 為何不直接去 GOT 表格找地址,如果GOT表沒有存就直接叫動態鏈接器就好 ? 為何要多此一舉的經過 PLT 再 GOT ? 🤔🤔,這個問題在 Stackoverflow 有人在討論,在 Shared Library 中 PLT 和 GOT 的使用機制 (opens new window) 和 Why does the PLT exist in addition to the GOT, instead of just using the GOT? (opens new window) 有提到,但是我認為都沒有回答到點上😂,這個問題我放在未解之謎。
接下來就是運用到我們的 debugger 來看動態鏈接的過程。
# 三、Debugger 實驗
在這裡我們使用進階的 gdb-peda,因為原始的 gdb 雖然夠用,但是 gdb-peda 可以更鉅細靡遺的展示各個暫存器資訊,執行狀態等,是個常常在逆向工程使用到的進階 debugger。安裝也是粉簡單
git clone https://github.com/longld/peda.git ~/peda
echo "source ~/peda/peda.py" >> ~/.gdbinit
echo "DONE! debug your program with gdb and enjoy"
2
3
2
3
那我們就以普通的 hello world 的程式碼來分析吧 ~
#include <stdio.h>
int main()
{
    printf("Hello World!\n");
}
2
3
4
5
2
3
4
5
# 3-1. 利用 Readelf 看 EOF 的格局及重定位符號
readelf -l hello
Elf file type is DYN (Shared object file)
Entry point 0x530
There are 9 program headers, starting at offset 64

Program Headers:
  Type           Offset             VirtAddr           PhysAddr
                 FileSiz            MemSiz              Flags  Align
  PHDR           0x0000000000000040 0x0000000000000040 0x0000000000000040
                 0x00000000000001f8 0x00000000000001f8  R      0x8
  INTERP         0x0000000000000238 0x0000000000000238 0x0000000000000238
                 0x000000000000001c 0x000000000000001c  R      0x1
      [Requesting program interpreter: /lib64/ld-linux-x86-64.so.2]
  LOAD           0x0000000000000000 0x0000000000000000 0x0000000000000000
                 0x00000000000008b0 0x00000000000008b0  R E    0x200000
  LOAD           0x0000000000000db8 0x0000000000200db8 0x0000000000200db8
                 0x0000000000000258 0x0000000000000260  RW     0x200000
  DYNAMIC        0x0000000000000dc8 0x0000000000200dc8 0x0000000000200dc8
                 0x00000000000001f0 0x00000000000001f0  RW     0x8
  NOTE           0x0000000000000254 0x0000000000000254 0x0000000000000254
                 0x0000000000000044 0x0000000000000044  R      0x4
  GNU_EH_FRAME   0x0000000000000768 0x0000000000000768 0x0000000000000768
                 0x000000000000003c 0x000000000000003c  R      0x4
  GNU_STACK      0x0000000000000000 0x0000000000000000 0x0000000000000000
                 0x0000000000000000 0x0000000000000000  RW     0x10
  GNU_RELRO      0x0000000000000db8 0x0000000000200db8 0x0000000000200db8
                 0x0000000000000248 0x0000000000000248  R      0x1

 Section to Segment mapping:
  Segment Sections...
   00
   01     .interp
   02     .interp .note.ABI-tag .note.gnu.build-id .gnu.hash .dynsym .dynstr .gnu.version .gnu.version_r .rela.dyn .rela.plt .init .plt .plt.got .text .fini .rodata .eh_frame_hdr .eh_frame
   03     .init_array .fini_array .dynamic .got .data .bss
   04     .dynamic
   05     .note.ABI-tag .note.gnu.build-id
   06     .eh_frame_hdr
   07
   08     .init_array .fini_array .dynamic .got
2
3
4
5
6
7
8
9
10
11
12
13
14
15
16
17
18
19
20
21
22
23
24
25
26
27
28
29
30
31
32
33
34
35
36
37
38
2
3
4
5
6
7
8
9
10
11
12
13
14
15
16
17
18
19
20
21
22
23
24
25
26
27
28
29
30
31
32
33
34
35
36
37
38
上面可以看到,哪幾個 section 屬於同一個 segment,例如 .got、.data、.bss 屬於同一個 Segment ,再來我們看看有哪些符號需要被重定位
readelf -r hello
Relocation section '.rela.dyn' at offset 0x410 contains 8 entries:
  Offset          Info           Type           Sym. Value    Sym. Name + Addend
000000200db8  000000000008 R_X86_64_RELATIVE                    630
000000200dc0  000000000008 R_X86_64_RELATIVE                    5f0
000000201008  000000000008 R_X86_64_RELATIVE                    201008
000000200fd8  000100000006 R_X86_64_GLOB_DAT 0000000000000000 _ITM_deregisterTMClone + 0
000000200fe0  000300000006 R_X86_64_GLOB_DAT 0000000000000000 __libc_start_main@GLIBC_2.2.5 + 0
000000200fe8  000400000006 R_X86_64_GLOB_DAT 0000000000000000 __gmon_start__ + 0
000000200ff0  000500000006 R_X86_64_GLOB_DAT 0000000000000000 _ITM_registerTMCloneTa + 0
000000200ff8  000600000006 R_X86_64_GLOB_DAT 0000000000000000 __cxa_finalize@GLIBC_2.2.5 + 0

Relocation section '.rela.plt' at offset 0x4d0 contains 1 entry:
  Offset          Info           Type           Sym. Value    Sym. Name + Addend
000000200fd0  000200000007 R_X86_64_JUMP_SLO 0000000000000000 puts@GLIBC_2.2.5 + 0
2
3
4
5
6
7
8
9
10
11
12
13
14
2
3
4
5
6
7
8
9
10
11
12
13
14
這個指令可以查看什麼符號需要被重定位,例如 : puts 等。而為了讓動態鏈接器確定是對哪個符號進行重定位,需要一個重定位表來儲存相關訊息
.rela.plt:這個section保存了.plt中保存的符號的重定位信息。
.rela.dyn:這個section保存了除了.plt中保存的符號外的其他符號的重定位信息。
由上面 readelf,可以看到各個section 的訊息,也可以看到我們以那些符號需要重定位,接下來我們需要再拉近一點距離看,會使用到 objdump
# 3-2. 利用 objdump 更仔細看 PLT, GOT 機制
objdump -D hello
hello:     file format elf64-x86-64


Disassembly of section .init:

00000000000004e8 <_init>:
 4e8:   48 83 ec 08             sub    $0x8,%rsp
 4ec:   48 8b 05 f5 0a 20 00    mov    0x200af5(%rip),%rax        # 200fe8 <__gmon_start__>
 4f3:   48 85 c0                test   %rax,%rax
 4f6:   74 02                   je     4fa <_init+0x12>
 4f8:   ff d0                   callq  *%rax
 4fa:   48 83 c4 08             add    $0x8,%rsp
 4fe:   c3                      retq

Disassembly of section .plt:

0000000000000500 <.plt>:
 500:   ff 35 ba 0a 20 00       pushq  0x200aba(%rip)        # 200fc0 <_GLOBAL_OFFSET_TABLE_+0x8>
 506:   ff 25 bc 0a 20 00       jmpq   *0x200abc(%rip)        # 200fc8 <_GLOBAL_OFFSET_TABLE_+0x10>
 50c:   0f 1f 40 00             nopl   0x0(%rax)

0000000000000510 <puts@plt>:
 510:   ff 25 ba 0a 20 00       jmpq   *0x200aba(%rip)        # 200fd0 <puts@GLIBC_2.2.5>
 516:   68 00 00 00 00          pushq  $0x0
 51b:   e9 e0 ff ff ff          jmpq   500 <.plt>

Disassembly of section .plt.got:

0000000000000520 <__cxa_finalize@plt>:
 520:   ff 25 d2 0a 20 00       jmpq   *0x200ad2(%rip)        # 200ff8 <__cxa_finalize@GLIBC_2.2.5>
 526:   66 90                   xchg   %ax,%ax

Disassembly of section .text:

0000000000000530 <_start>:
 530:   31 ed                   xor    %ebp,%ebp
 532:   49 89 d1                mov    %rdx,%r9
 535:   5e                      pop    %rsi
 536:   48 89 e2                mov    %rsp,%rdx
 539:   48 83 e4 f0             and    $0xfffffffffffffff0,%rsp
 53d:   50                      push   %rax
 53e:   54                      push   %rsp
 53f:   4c 8d 05 8a 01 00 00    lea    0x18a(%rip),%r8        # 6d0 <__libc_csu_fini>
 546:   48 8d 0d 13 01 00 00    lea    0x113(%rip),%rcx        # 660 <__libc_csu_init>
 54d:   48 8d 3d e6 00 00 00    lea    0xe6(%rip),%rdi        # 63a <main>
 554:   ff 15 86 0a 20 00       callq  *0x200a86(%rip)        # 200fe0 <__libc_start_main@GLIBC_2.2.5>
 55a:   f4                      hlt
 55b:   0f 1f 44 00 00          nopl   0x0(%rax,%rax,1)

0000000000000560 <deregister_tm_clones>:
 560:   48 8d 3d a9 0a 20 00    lea    0x200aa9(%rip),%rdi        # 201010 <__TMC_END__>
 567:   55                      push   %rbp
 568:   48 8d 05 a1 0a 20 00    lea    0x200aa1(%rip),%rax        # 201010 <__TMC_END__>
 56f:   48 39 f8                cmp    %rdi,%rax
 572:   48 89 e5                mov    %rsp,%rbp
 575:   74 19                   je     590 <deregister_tm_clones+0x30>
 577:   48 8b 05 5a 0a 20 00    mov    0x200a5a(%rip),%rax        # 200fd8 <_ITM_deregisterTMCloneTable>
 57e:   48 85 c0                test   %rax,%rax
 581:   74 0d                   je     590 <deregister_tm_clones+0x30>
 583:   5d                      pop    %rbp
 584:   ff e0                   jmpq   *%rax
 586:   66 2e 0f 1f 84 00 00    nopw   %cs:0x0(%rax,%rax,1)
 58d:   00 00 00
 590:   5d                      pop    %rbp
 591:   c3                      retq
 592:   0f 1f 40 00             nopl   0x0(%rax)
 596:   66 2e 0f 1f 84 00 00    nopw   %cs:0x0(%rax,%rax,1)
 59d:   00 00 00

00000000000005a0 <register_tm_clones>:
 5a0:   48 8d 3d 69 0a 20 00    lea    0x200a69(%rip),%rdi        # 201010 <__TMC_END__>
 5a7:   48 8d 35 62 0a 20 00    lea    0x200a62(%rip),%rsi        # 201010 <__TMC_END__>
 5ae:   55                      push   %rbp
 5af:   48 29 fe                sub    %rdi,%rsi
 5b2:   48 89 e5                mov    %rsp,%rbp
 5b5:   48 c1 fe 03             sar    $0x3,%rsi
 5b9:   48 89 f0                mov    %rsi,%rax
 5bc:   48 c1 e8 3f             shr    $0x3f,%rax
 5c0:   48 01 c6                add    %rax,%rsi
 5c3:   48 d1 fe                sar    %rsi
 5c6:   74 18                   je     5e0 <register_tm_clones+0x40>
 5c8:   48 8b 05 21 0a 20 00    mov    0x200a21(%rip),%rax        # 200ff0 <_ITM_registerTMCloneTable>
 5cf:   48 85 c0                test   %rax,%rax
 5d2:   74 0c                   je     5e0 <register_tm_clones+0x40>
 5d4:   5d                      pop    %rbp
 5d5:   ff e0                   jmpq   *%rax
 5d7:   66 0f 1f 84 00 00 00    nopw   0x0(%rax,%rax,1)
 5de:   00 00
 5e0:   5d                      pop    %rbp
 5e1:   c3                      retq
 5e2:   0f 1f 40 00             nopl   0x0(%rax)
 5e6:   66 2e 0f 1f 84 00 00    nopw   %cs:0x0(%rax,%rax,1)
 5ed:   00 00 00

00000000000005f0 <__do_global_dtors_aux>:
 5f0:   80 3d 19 0a 20 00 00    cmpb   $0x0,0x200a19(%rip)        # 201010 <__TMC_END__>
 5f7:   75 2f                   jne    628 <__do_global_dtors_aux+0x38>
 5f9:   48 83 3d f7 09 20 00    cmpq   $0x0,0x2009f7(%rip)        # 200ff8 <__cxa_finalize@GLIBC_2.2.5>
 600:   00
 601:   55                      push   %rbp
 602:   48 89 e5                mov    %rsp,%rbp
 605:   74 0c                   je     613 <__do_global_dtors_aux+0x23>
 607:   48 8b 3d fa 09 20 00    mov    0x2009fa(%rip),%rdi        # 201008 <__dso_handle>
 60e:   e8 0d ff ff ff          callq  520 <__cxa_finalize@plt>
 613:   e8 48 ff ff ff          callq  560 <deregister_tm_clones>
 618:   c6 05 f1 09 20 00 01    movb   $0x1,0x2009f1(%rip)        # 201010 <__TMC_END__>
 61f:   5d                      pop    %rbp
 620:   c3                      retq
 621:   0f 1f 80 00 00 00 00    nopl   0x0(%rax)
 628:   f3 c3                   repz retq
 62a:   66 0f 1f 44 00 00       nopw   0x0(%rax,%rax,1)

0000000000000630 <frame_dummy>:
 630:   55                      push   %rbp
 631:   48 89 e5                mov    %rsp,%rbp
 634:   5d                      pop    %rbp
 635:   e9 66 ff ff ff          jmpq   5a0 <register_tm_clones>

000000000000063a <main>:
 63a:   55                      push   %rbp
 63b:   48 89 e5                mov    %rsp,%rbp
 63e:   48 8d 3d 9f 00 00 00    lea    0x9f(%rip),%rdi        # 6e4 <_IO_stdin_used+0x4>
 645:   e8 c6 fe ff ff          callq  510 <puts@plt>
 64a:   b8 00 00 00 00          mov    $0x0,%eax
 64f:   5d                      pop    %rbp
 650:   c3                      retq
 651:   66 2e 0f 1f 84 00 00    nopw   %cs:0x0(%rax,%rax,1)
 658:   00 00 00
 65b:   0f 1f 44 00 00          nopl   0x0(%rax,%rax,1)

0000000000000660 <__libc_csu_init>:
 660:   41 57                   push   %r15
 662:   41 56                   push   %r14
 664:   49 89 d7                mov    %rdx,%r15
 667:   41 55                   push   %r13
 669:   41 54                   push   %r12
 66b:   4c 8d 25 46 07 20 00    lea    0x200746(%rip),%r12        # 200db8 <__frame_dummy_init_array_entry>
 672:   55                      push   %rbp
 673:   48 8d 2d 46 07 20 00    lea    0x200746(%rip),%rbp        # 200dc0 <__init_array_end>
 67a:   53                      push   %rbx
 67b:   41 89 fd                mov    %edi,%r13d
 67e:   49 89 f6                mov    %rsi,%r14
 681:   4c 29 e5                sub    %r12,%rbp
 684:   48 83 ec 08             sub    $0x8,%rsp
 688:   48 c1 fd 03             sar    $0x3,%rbp
 68c:   e8 57 fe ff ff          callq  4e8 <_init>
 691:   48 85 ed                test   %rbp,%rbp
 694:   74 20                   je     6b6 <__libc_csu_init+0x56>
 696:   31 db                   xor    %ebx,%ebx
 698:   0f 1f 84 00 00 00 00    nopl   0x0(%rax,%rax,1)
 69f:   00
 6a0:   4c 89 fa                mov    %r15,%rdx
 6a3:   4c 89 f6                mov    %r14,%rsi
 6a6:   44 89 ef                mov    %r13d,%edi
 6a9:   41 ff 14 dc             callq  *(%r12,%rbx,8)
 6ad:   48 83 c3 01             add    $0x1,%rbx
 6b1:   48 39 dd                cmp    %rbx,%rbp
 6b4:   75 ea                   jne    6a0 <__libc_csu_init+0x40>
 6b6:   48 83 c4 08             add    $0x8,%rsp
 6ba:   5b                      pop    %rbx
 6bb:   5d                      pop    %rbp
 6bc:   41 5c                   pop    %r12
 6be:   41 5d                   pop    %r13
 6c0:   41 5e                   pop    %r14
 6c2:   41 5f                   pop    %r15
 6c4:   c3                      retq
 6c5:   90                      nop
 6c6:   66 2e 0f 1f 84 00 00    nopw   %cs:0x0(%rax,%rax,1)
 6cd:   00 00 00

00000000000006d0 <__libc_csu_fini>:
 6d0:   f3 c3                   repz retq

Disassembly of section .fini:

00000000000006d4 <_fini>:
 6d4:   48 83 ec 08             sub    $0x8,%rsp
 6d8:   48 83 c4 08             add    $0x8,%rsp
 6dc:   c3                      retq
2
3
4
5
6
7
8
9
10
11
12
13
14
15
16
17
18
19
20
21
22
23
24
25
26
27
28
29
30
31
32
33
34
35
36
37
38
39
40
41
42
43
44
45
46
47
48
49
50
51
52
53
54
55
56
57
58
59
60
61
62
63
64
65
66
67
68
69
70
71
72
73
74
75
76
77
78
79
80
81
82
83
84
85
86
87
88
89
90
91
92
93
94
95
96
97
98
99
100
101
102
103
104
105
106
107
108
109
110
111
112
113
114
115
116
117
118
119
120
121
122
123
124
125
126
127
128
129
130
131
132
133
134
135
136
137
138
139
140
141
142
143
144
145
146
147
148
149
150
151
152
153
154
155
156
157
158
159
160
161
162
163
164
165
166
167
168
169
170
171
172
173
174
175
176
177
178
179
雖然產生出一大串文字,但是仔細看,我們可以發現一些蛛絲馬跡,首先 <main>
000000000000063a <main>:
 63a:   55                      push   %rbp
 63b:   48 89 e5                mov    %rsp,%rbp
 63e:   48 8d 3d 9f 00 00 00    lea    0x9f(%rip),%rdi        # 6e4 <_IO_stdin_used+0x4>
 645:   e8 c6 fe ff ff          callq  510 <puts@plt>
 64a:   b8 00 00 00 00          mov    $0x0,%eax
 64f:   5d                      pop    %rbp
 650:   c3                      retq
 651:   66 2e 0f 1f 84 00 00    nopw   %cs:0x0(%rax,%rax,1)
 658:   00 00 00
 65b:   0f 1f 44 00 00          nopl   0x0(%rax,%rax,1)
2
3
4
5
6
7
8
9
10
11
2
3
4
5
6
7
8
9
10
11
call 510 <puts@plt>: 跳到 PLT 表 510 的位置,接下來就是關鍵所在😀
我們先看 PLT 表格,每一個元素真的都是放一段指令碼,而且大同小異,短短三行涵蓋精隨,在第一個元素 <.plt>,就是去呼叫 resolver 的指令,
objdump -d -j .plt hello
Disassembly of section .plt:

0000000000000500 <.plt>:
 500:   ff 35 ba 0a 20 00       pushq  0x200aba(%rip)        # 200fc0 <_GLOBAL_OFFSET_TABLE_+0x8>
 506:   ff 25 bc 0a 20 00       jmpq   *0x200abc(%rip)        # 200fc8 <_GLOBAL_OFFSET_TABLE_+0x10>
 50c:   0f 1f 40 00             nopl   0x0(%rax)

0000000000000510 <puts@plt>:
 510:   ff 25 ba 0a 20 00       jmpq   *0x200aba(%rip)        # 200fd0 <puts@GLIBC_2.2.5>
 516:   68 00 00 00 00          pushq  $0x0
 51b:   e9 e0 ff ff ff          jmpq   500 <.plt>
2
3
4
5
6
7
8
9
10
11
2
3
4
5
6
7
8
9
10
11
所以你看第二個元素
0000000000000510 <puts@plt>:
 510:   ff 25 ba 0a 20 00       jmpq   *0x200aba(%rip)        # 200fd0 <puts@GLIBC_2.2.5>
 516:   68 00 00 00 00          pushq  $0x0
 51b:   e9 e0 ff ff ff          jmpq   500 <.plt>
2
3
4
2
3
4
第一行,當 GOT 表格內容有 put 函數地址,就跳過去 put 地址執行,那 GOT 表格該項的地址由 *0x200aba(%rip) 得到,這行指令是 rip 值 + 0x200aba, rip 暫存器值是下一個執行指令的地址,以這裡為例
0x516 + 0x200aba = 0x200fd0 = 我們要去 GOT 找的項目地址,可能是 GOT[1], GOT[2]...
第二、三行,就是當 GOT 表項內存的是 0x516,表示沒有該符號的地址, 我們就必須跳回來執行,因為要去找動態鏈接器的地址,那如同前面所述,動態鏈接器通常就在 PLT 表格的第一項,所以可以看到有 jmpq 500 <.plt>,又跳到 PLT 第一項,去找我們的動態鏈接器求救。
那我們去循線找看看,GOT表的內容物吧
objdump -d -j .got hello
hello:     file format elf64-x86-64
Disassembly of section .got:

0000000000200fb8 <_GLOBAL_OFFSET_TABLE_>:
  200fb8:       c8 0d 20 00 00 00 00 00 00 00 00 00 00 00 00 00     .. .............
        ...
  200fd0:       16 05 00 00 00 00 00 00 00 00 00 00 00 00 00 00     ................
2
3
4
5
6
7
2
3
4
5
6
7
你會發現有兩個項目
- GOT[0]: 200fb8: c8 0d 20 00 00 00 00 00 00 00 00 00 00 00 00 00
- GOT[1]: 200fd0: 16 05 00 00 00 00 00 00 00 00 00 00 00 00 00 00
在剛剛 PLT 表格,我們剛剛計算他跳到的地址是
0x516 + 0x200aba = 0x200fd0
就是我們 GOT[1] 那項,該內容是 0x516,0x516 是哪裡 ? 就是剛剛 PLT 的指令地址
0000000000000510 <puts@plt>:
 510:   ff 25 ba 0a 20 00       jmpq   *0x200aba(%rip)        # 200fd0 <puts@GLIBC_2.2.5>
 516:   68 00 00 00 00          pushq  $0x0
 51b:   e9 e0 ff ff ff          jmpq   500 <.plt>
2
3
4
2
3
4
是不是串起來了 ? 當 GOT 內沒有函數地址,就會叫你跳回去找動態鏈接器。
所以流程就是
利用 objdump 後,我們又更了解他的跳轉原理。😉
# 3-3. 利用 gdb-peda 動手追蹤
gdb ./hello
我們先來在 main 函數下斷點
b *main
再執行
r
 有沒有看到美麗的儀表板🤣,接下來就可以利用
 gdb-peda 的強大的功能了,接下來我們來反組譯 put 那行,這一行就是跳轉到 PLT 的指令。
   0x8000631 <frame_dummy+1>:   mov    rbp,rsp
   0x8000634 <frame_dummy+4>:   pop    rbp
   0x8000635 <frame_dummy+5>:   jmp    0x80005a0 <register_tm_clones>
=> 0x800063a <main>:    push   rbp
   0x800063b <main+1>:  mov    rbp,rsp
   0x800063e <main+4>:  lea    rdi,[rip+0x9f]        # 0x80006e4
   0x8000645 <main+11>: call   0x8000510 <puts@plt>
   0x800064a <main+16>: mov    eax,0x0
2
3
4
5
6
7
8
2
3
4
5
6
7
8
你可以發現在上一章節的地址 0x510,那因為載入到記憶體起始位置有改變,所以要平移,3-1 和 3-2 起始位置是 0,因為還沒載入到記憶體,但是載入後,起始位置是 0x8000510。
gdb-peda$ pdisass 0x8000510
Dump of assembler code from 0x8000510 to 0x8000530::    Dump of assembler code from 0x8000510 to 0x8000530:
   0x0000000008000510 <puts@plt+0>:     jmp    QWORD PTR [rip+0x200aba]        # 0x8200fd0
   0x0000000008000516 <puts@plt+6>:     push   0x0
   0x000000000800051b <puts@plt+11>:    jmp    0x8000500
   0x0000000008000520 <__cxa_finalize@plt+0>:   jmp    QWORD PTR [rip+0x200ad2]        # 0x8200ff8
   0x0000000008000526 <__cxa_finalize@plt+6>:   xchg   ax,ax
   0x0000000008000528:  add    BYTE PTR [rax],al
   0x000000000800052a:  add    BYTE PTR [rax],al
   0x000000000800052c:  add    BYTE PTR [rax],al
   0x000000000800052e:  add    BYTE PTR [rax],al
End of assembler dump.
2
3
4
5
6
7
8
9
10
11
12
2
3
4
5
6
7
8
9
10
11
12
我們再循線下去,我們反組譯 GOT 表格地址 0x8200fd0
gdb-peda$ disassemble 0x8200fd0
Dump of assembler code for function _GLOBAL_OFFSET_TABLE_:
   0x0000000008200fb8:  enter  0x200d,0x0
   0x0000000008200fbc:  add    BYTE PTR [rax],al
   0x0000000008200fbe:  add    BYTE PTR [rax],al
   0x0000000008200fc0:  add    BYTE PTR [rax],al
   0x0000000008200fc2:  add    BYTE PTR [rax],al
   0x0000000008200fc4:  add    BYTE PTR [rax],al
   0x0000000008200fc6:  add    BYTE PTR [rax],al
   0x0000000008200fc8:  add    BYTE PTR [rax],al
   0x0000000008200fca:  add    BYTE PTR [rax],al
   0x0000000008200fcc:  add    BYTE PTR [rax],al
   0x0000000008200fce:  add    BYTE PTR [rax],al
   0x0000000008200fd0:  movabs al,ds:0x7fffff080a
   0x0000000008200fd9:  add    BYTE PTR [rax],al
   0x0000000008200fdb:  add    BYTE PTR [rax],al
   0x0000000008200fdd:  add    BYTE PTR [rax],al
   0x0000000008200fdf:  add    BYTE PTR [rax],dl
   0x0000000008200fe1:  sbb    eax,DWORD PTR [rdx]
   0x0000000008200fe3:  (bad)
   0x0000000008200fe4:  (bad)
   0x0000000008200fe5:  jg     0x8200fe7
   0x0000000008200fe7:  add    BYTE PTR [rax],al
   0x0000000008200fe9:  add    BYTE PTR [rax],al
   0x0000000008200feb:  add    BYTE PTR [rax],al
   0x0000000008200fed:  add    BYTE PTR [rax],al
   0x0000000008200fef:  add    BYTE PTR [rax],al
   0x0000000008200ff1:  add    BYTE PTR [rax],al
   0x0000000008200ff3:  add    BYTE PTR [rax],al
   0x0000000008200ff5:  add    BYTE PTR [rax],al
   0x0000000008200ff7:  add    BYTE PTR [rax+0x36],al
   0x0000000008200ffa:  add    al,0xff
   0x0000000008200ffc:  (bad)
   0x0000000008200ffd:  jg     0x8200fff
   0x0000000008200fff:  add    BYTE PTR [rax],al
2
3
4
5
6
7
8
9
10
11
12
13
14
15
16
17
18
19
20
21
22
23
24
25
26
27
28
29
30
31
32
33
34
35
2
3
4
5
6
7
8
9
10
11
12
13
14
15
16
17
18
19
20
21
22
23
24
25
26
27
28
29
30
31
32
33
34
35
可以看到 0x0000000008200fd0: movabs al,ds:0x7fffff080a,儲存一個地址,那個就是 put 函數的地址,這裡有幾種方式可以確認是 put 函數地址
- 利用
tele指令
gdb-peda$ tele 0x8200fd0
0000| 0x8200fd0 --> 0x7fffff080aa0 (<_IO_puts>: push   r13)
0008| 0x8200fd8 --> 0x0
0016| 0x8200fe0 --> 0x7fffff021b10 (<__libc_start_main>:        push   r13)
0024| 0x8200fe8 --> 0x0
0032| 0x8200ff0 --> 0x0
0040| 0x8200ff8 --> 0x7fffff043640 (<__cxa_finalize>:   push   r15)
0048| 0x8201000 --> 0x0
0056| 0x8201008 (0x0000000008201008)
2
3
4
5
6
7
8
9
2
3
4
5
6
7
8
9
- 利用
xinfo指令
gdb-peda$ xinfo 0x8200fd0
0x8200fd0 --> 0x7fffff080aa0 (<_IO_puts>:       push   r13)
Virtual memory mapping:
Start : 0x08200000
End   : 0x08201000
Offset: 0xfd0
Perm  : r--p
Name  : /mnt/c/Users/lovel/Desktop/linker/hello
2
3
4
5
6
7
8
2
3
4
5
6
7
8
- 利用
print指令
gdb-peda$ print puts
$1 = {int (const char *)} 0x7fffff080aa0 <_IO_puts>
2
2
- 當然,你也可以直接看 PLT 的項目名稱得知
gdb-peda$ x/16x 0x0000000008000510
0x8000510 <puts@plt>:   0x0aba25ff      0x00680020      0xe9000000      0xffffffe0
0x8000520 <__cxa_finalize@plt>: 0x0ad225ff      0x90660020      0x00000000      0x00000000
0x8000530 <_start>:     0x8949ed31      0x89485ed1      0xe48348e2      0x4c5450f0
0x8000540 <_start+16>:  0x018a058d      0x8d480000      0x0001130d      0x3d8d4800
2
3
4
5
2
3
4
5
還真的是 puts 函數地址,那接下來我們要確認是否為 libc.so 的符號,利用 info symbol 查看
gdb-peda$ info symbol puts
puts in section .text of /lib/x86_64-linux-gnu/libc.so.6
2
2
我們更加確定,透過 GOT 儲存的 put地址,就直接跳到 libc.so 的程式碼區段去執行 ~
咦 !? 為什麼你的 GDB 追蹤,GOT 直接就有地址值了,沒有再跳回去 PLT 重新解析,這裡有個比較奇怪的地方,就是載入時就幫你做好符號解析了,GOT表就存放 puts 的函數地址,不需要再去叫動態鏈接器做事,其實很多參考連結,都可以追蹤到 dl_runtime_resolve 的函數,但我這裡總是沒追到。
我認為有可能是比較新的載入器(loader)設計對動態鏈結符號解析有再做一些最佳化,Linux/ELF動態鏈接部分機制(GOT&PLT) (opens new window) 也有遇到相同問題。經過了幾番尋找,這正是下一篇介紹的技術 - prelink。
# 3-4. ASLR and Prelink 技術
在上一個小節,我們用 gdb 來追查動態鏈結的行為,卻發現 GOT 表沒有經過動態鏈結器就存放了 put 的地址, 好像是預先就做好符號解析一樣,沒錯,回到動態鏈結,你可以發現最原始動態鏈結的方法會帶來一些成本,每次重新啟動時都要重新解析符號地址。解析時又要額外叫動態鏈接器來幫忙。一來一回會浪費很多 CPU cycle 去執行,假設今天要解析一千萬個符號,我相信動態鏈接重定位符號的時間一定佔用不少執行期時間。所以今天在現代作業系統就有更進一步的作法 - 預鏈接(prelink)。
Prelink wiki (opens new window)
- 定義
In computing, prebinding, also called prelinking, is a method for optimizing application load times by resolving library symbols prior to launch.
Prelink 是一個在程式執行前先解析函式庫符號地址的一種最佳化方法。這也可以對應到,我們在 3-1、3-2 小節看到還沒執行時的,GOT[1] 表放的是 PLT 下一個地址,但在執行時就馬上有 put 函數的地址,好像是某個無名英雄默默行善,或是像 JOJO 第五部大魔王迪亞波羅的替身緋紅之王的能力 - 時間刪除。

扯遠了🤣,這個無名英雄就是 Prelink,在維基中也有提到
While dynamic linking has advantages in code size and management, there are drawbacks as well. Every time a program is run, the loader needs to resolve (find) the relevant libraries. Since libraries move around in memory, there is a performance penalty for resolution. This penalty increases for each additional library needing resolution. Prelinking reduces this penalty by resolving libraries in advance. Afterward, resolution only occurs if the libraries have changed since being prelinked, such as following perhaps an upgrade.
當事先做鏈接,有個好處就是可以在執行執行得更快,GOT 表格就已經更新好了,不用執行時做解析當然可以跑得更快 ! 而且最後面提到,如果函式庫更新才需要做地址重定位重解析。
在使用 Prelink 加速程序啓動 (opens new window),一文中,也有介紹
Prelink 是 Red Hat 開發者 Jakub Jelinek 所設計的工具。正如其名字所示,Prelink 利用事先鏈接代替運行時鏈接的方法來加速共享庫的加載。它不僅可以加快起動速度,還可以減少部分內存開銷,是各種 Linux 架構上用於減少程序載入時間、縮短系統啓動時間和加快應用程序啓動的很受歡迎的一個工具。 Prelink 工具的原理主要基於這樣一個事實:動態鏈接和加載的過程開銷很大,並且在大多數的系統上,函數庫並不會常常被更動,每次程序被執行時所進行的鏈接動作都是完全相同的 ,對於嵌入式系統來說尤其如此。因此,這一過程可以改在執行前就可以預先處理好,即花一些時間利用 Prelink 工具對動態共享庫和可執行文件進行處理,修改這些二進制文件並加入相應的重定位等信息,節約了本來在程序啓動時的比較耗時的查詢函數地址等工作,這樣可以減少程序啓動的時,同時也減少了內存的耗用。 Prelink 的這種做法當然也有代價:每次更新動態共享庫時,相關的可執行文件都需要重新執行一遍 Prelink 才能保證有效,因爲新的共享庫中的符號信息、地址等很可能與原來的已經不同了。這種代價對於嵌入式系統的開發者來說可能稍微帶來一些複雜度,不過好在對用戶來說幾乎是可以忽略的。
你對 Prelink 可能就一些理解了,簡單來說就是預先處理好引用符號地址到 GOT 表,真正載入後執行就可以直接把 GOT 當快取去執行函數。
在程式啓動時,當調用 printf 的時候,程序會將處理權交給 loader,由其負責在行程以及其鏈接的動態庫中查找 printf 的函數地址。由於 loader 不知道 printf 是在哪個動態庫,所以它將在整個行程和動態庫的範圍內查找。更糟糕的是在 C++ 程序中,符號的命名是類名+函數名,這導致在做字符串比較時,往往直到字符串的結尾才能獲得結果。
這就導致了,在行程啓動過程中,符號查找往往佔據了大部分時間。據統計,在 Linux 的 KDE 進程中啓動過程中,符號查找表竟佔據了行程啓動 80% 的時間 。有沒有辦法來改進呢?如果進程在執行前,就能獲知動態庫的加載地址,那麼函數調用的地址就應該是已知的,我們就可以通過修改執行程序,來避免符號的查找。從而節省行程啓動的時間。
另外和 dynamic linker 跟 prelink 有關的技術,是 ASLR(Address Space Layout Randomization),簡單來說就是每次載入時函式庫的基本地址是隨機的,如下
unix$ ldd hello
        linux-vdso.so.1 (0x00007fffe3188000)
        libc.so.6 => /lib/x86_64-linux-gnu/libc.so.6 (0x00007fa6ccff0000)
        /lib64/ld-linux-x86-64.so.2 (0x00007fa6cd800000)

unix$ ldd hello
        linux-vdso.so.1 (0x00007fffd6150000)
        libc.so.6 => /lib/x86_64-linux-gnu/libc.so.6 (0x00007f6b26ce0000)
        /lib64/ld-linux-x86-64.so.2 (0x00007f6b27400000)

unix$ ldd hello
        linux-vdso.so.1 (0x00007fffe9e6a000)
        libc.so.6 => /lib/x86_64-linux-gnu/libc.so.6 (0x00007f664d7e0000)
        /lib64/ld-linux-x86-64.so.2 (0x00007f664de00000)
2
3
4
5
6
7
8
9
10
11
12
13
14
2
3
4
5
6
7
8
9
10
11
12
13
14
你也可以利用 strace ./hello 看看用到的 System Call
execve("./hello", ["./hello"], 0x7ffffea85260 /* 21 vars */) = 0
brk(NULL)                               = 0x7fffe8b5d000
access("/etc/ld.so.nohwcap", F_OK)      = -1 ENOENT (No such file or directory)
access("/etc/ld.so.preload", R_OK)      = -1 ENOENT (No such file or directory)
openat(AT_FDCWD, "/etc/ld.so.cache", O_RDONLY|O_CLOEXEC) = 3
fstat(3, {st_mode=S_IFREG|0644, st_size=46345, ...}) = 0
mmap(NULL, 46345, PROT_READ, MAP_PRIVATE, 3, 0) = 0x7f6966ed8000
close(3)                                = 0
access("/etc/ld.so.nohwcap", F_OK)      = -1 ENOENT (No such file or directory)
openat(AT_FDCWD, "/lib/x86_64-linux-gnu/libc.so.6", O_RDONLY|O_CLOEXEC) = 3
read(3, "\177ELF\2\1\1\3\0\0\0\0\0\0\0\0\3\0>\0\1\0\0\0\20\35\2\0\0\0\0\0"..., 832) = 832
fstat(3, {st_mode=S_IFREG|0755, st_size=2030928, ...}) = 0
mmap(NULL, 8192, PROT_READ|PROT_WRITE, MAP_PRIVATE|MAP_ANONYMOUS, -1, 0) = 0x7f6966ed0000
mmap(NULL, 4131552, PROT_READ|PROT_EXEC, MAP_PRIVATE|MAP_DENYWRITE, 3, 0) = 0x7f6966800000
mprotect(0x7f69669e7000, 2097152, PROT_NONE) = 0
mmap(0x7f6966be7000, 24576, PROT_READ|PROT_WRITE, MAP_PRIVATE|MAP_FIXED|MAP_DENYWRITE, 3, 0x1e7000) = 0x7f6966be7000
mmap(0x7f6966bed000, 15072, PROT_READ|PROT_WRITE, MAP_PRIVATE|MAP_FIXED|MAP_ANONYMOUS, -1, 0) = 0x7f6966bed000
close(3)                                = 0
arch_prctl(ARCH_SET_FS, 0x7f6966ed14c0) = 0
mprotect(0x7f6966be7000, 16384, PROT_READ) = 0
mprotect(0x7f6967200000, 4096, PROT_READ) = 0
mprotect(0x7f6966e29000, 4096, PROT_READ) = 0
munmap(0x7f6966ed8000, 46345)           = 0
fstat(1, {st_mode=S_IFCHR|0660, st_rdev=makedev(4, 3), ...}) = 0
ioctl(1, TCGETS, {B38400 opost isig icanon echo ...}) = 0
brk(NULL)                               = 0x7fffe8b5d000
brk(0x7fffe8b7e000)                     = 0x7fffe8b7e000
write(1, "Hello World!\n", 13Hello World!
)          = 13
exit_group(0)                           = ?
+++ exited with 0 +++
2
3
4
5
6
7
8
9
10
11
12
13
14
15
16
17
18
19
20
21
22
23
24
25
26
27
28
29
30
31
2
3
4
5
6
7
8
9
10
11
12
13
14
15
16
17
18
19
20
21
22
23
24
25
26
27
28
29
30
31
最後,如果想知道如何結合 ASLR 和 prelink 機制,可以參考
- Dynamic-prelink: An Enhanced Prelinking Mechanism without Modifying Shared Libraries (opens new window),以後有時間會分享文章。
# 3-5. 靜態鏈結和動態鏈結的比較
參考至 Static linking vs dynamic linking (opens new window),比較動態鏈接跟靜態鏈接的優缺點
靜態鏈結 (Static link)
優點
- 啟動速度比動態鏈結稍微快一點(但也取決於技術)
- 因為他將所有需要的東西、函式庫打包,靜態連結後的執行檔案更容易在不同環境順利執行
- 很適合在有限的資源環境下(開機程序、救援模式等)
缺點
- 程式肥胖,耗硬碟、記憶體資源
- 更新函式庫時要重新編譯鏈結打包
動態鏈結 (Dynamic link)
優點
- 動態鏈結程式占用記憶體、硬碟空間較小
- 延遲綁定(lazy binding)機制
- 幾乎無痛更新函式庫,程式也可以順利執行
缺點
- 每次都要重新解析符號地址,動態鏈接器會占用執行期不少的CPU時間,改善的機制為prelink
- DLL Hell - 更新函式庫發生的問題,導致程式無法順利執行
# 四、未解之謎
- 為何需要 PLT,不直接使用 GOT 就好,GOT 內預設放 resolver 地址,如果還沒解析就去更新這個表項,有的話就直接跳轉 ?
參考這篇 Why does the PLT exist in addition to the GOT, instead of just using the GOT? (opens new window)
- 如何關掉 prelink 的機制,這樣我比較好追蹤 GOT PLT 的機制 🤣
# 🎉 2021/09/26 解開 - 一切都是 GCC 的鍋 🎉
之後我又回來複習一遍時,深入去找原因,為什麼我的 PLT 總是已經被鏈接好了 ?
在看到 Understanding _dl_runtime_resolve() (opens new window) 後,我就發現該作者下了 gcc -Wl,-z,lazy -o hello hello.c 當中的 lazy 選項,為什麼要 顯式指定 lazy,隨後我使用 ld --help | grep "\-z lazy" 指令查詢,得到下列結果
-z lazy Mark object lazy runtime binding (default)
咦 ? 那為何預設是 lazy binding 但是卻預先鏈結好了? 直到我找到了這一篇 Why does gcc link with '-z now' by default, although lazy binding is the default for ld? (opens new window)
問問題的人問為什麼 ld 預設是 -z lazy,但是 gcc 卻自動送給 linker -z now -z relro 請 linker 馬上鏈結跟重定位
gcc --verbose -o hello_link hello.c
COLLECT_GCC_OPTIONS='-v' '-o' 'hello_link' '-mtune=generic' '-march=x86-64'
 /usr/lib/gcc/x86_64-linux-gnu/7/collect2 -plugin /usr/lib/gcc/x86_64-linux-gnu/7/liblto_plugin.so -plugin-opt=/usr/lib/gcc/x86_64-linux-gnu/7/lto-wrapper -plugin-opt=-fresolution=/tmp/cceRjjri.res -plugin-opt=-pass-through=-lgcc -plugin-opt=-pass-through=-lgcc_s -plugin-opt=-pass-through=-lc -plugin-opt=-pass-through=-lgcc -plugin-opt=-pass-through=-lgcc_s --build-id --eh-frame-hdr -m elf_x86_64 --hash-style=gnu --as-needed -dynamic-linker /lib64/ld-linux-x86-64.so.2 -pie
 -z now -z relro -o hello_link /
 usr/lib/gcc/x86_64-linux-gnu/7/../../../x86_64-linux-gnu/Scrt1.o /usr/lib/gcc/x86_64-linux-gnu/7/../../../x86_64-linux-gnu/crti.o /usr/lib/gcc/x86_64-linux-gnu/7/crtbeginS.o -L/usr/lib/gcc/x86_64-linux-gnu/7 -L/usr/lib/gcc/x86_64-linux-gnu/7/../../../x86_64-linux-gnu -L/usr/lib/gcc/x86_64-linux-gnu/7/../../../../lib -L/lib/x86_64-linux-gnu -L/lib/../lib -L/usr/lib/x86_64-linux-gnu -L/usr/lib/../lib -L/usr/lib/gcc/x86_64-linux-gnu/7/../../.. /tmp/ccdANW6g.o -lgcc --push-state --as-needed -lgcc_s --pop-state -lc -lgcc --push-state --as-needed -lgcc_s --pop-state /usr/lib/gcc/x86_64-linux-gnu/7/crtendS.o /usr/lib/gcc/x86_64-linux-gnu/7/../../../x86_64-linux-gnu/crtn.o
COLLECT_GCC_OPTIONS='-v' '-o' 'hello_link' '-mtune=generic' '-march=x86-64'
2
3
4
5
2
3
4
5
我就馬上知道了,因為我之前的編譯方式是 gcc -g -Wall hell.c -o hello,gcc 會自動預設送 -z now -z relro,難怪會這樣 = =,害我都追蹤不到動態鏈結器跟 Lazy-binding 機制。但是其實這麼做是有原因的
因為 GOT 在 lazy binding 時會變成可寫的記憶體區段,會遭受 GOT hijacking(overwrite) 的攻擊,如果載入前就鏈結好,就可以把GOT變成唯讀區段,就會比較安全,此種方法叫做 RELRO: RELocation Read-Only,是 ubuntu 16.10 引進的名為
ELF binary hardening feature,所以如果往後要自行追蹤 GOT 時,用 gcc 編譯時要記得顯式加入 -z lazy 不然就是自行手動鏈結。
另外因為這個謎底解開,也發現前面有些錯誤,GOT 表其實前三項是原本就有定義的,但是若先鏈結好,就可以從 GOT[1] 開始放符號位置了,因為不再需要動態鏈結器幫忙解析跟重定位了。
| GOT 項 | 作用 |
|---|---|
| GOT[0] | 紀錄執行檔的 .dynamic section 的位置,這section紀錄很多動態鏈結器的需要知道的資訊(此執行檔相依的函式庫等),做初始化的動作 |
| GOT[1] | 放 link_map 的 結構體的 doubly linked list,內有紀錄函式庫路徑跟名稱等資訊,初始值是 0,但是等動態鏈結器初始化後得到所有的相依函式庫的資訊,就會用這種方式串起來,隨後有要解析的符號就會一個一個相依的函式庫下去找 |
| GOT[2] | 一樣初始值是 0,等動態鏈結器初始化完後才有值,這裡放 _dl_runtime_resolve() 的函式地址,把 link_map 傳入就可以開始解析未知的符號並修改 GOT 表 |
GCC 幫我們處理很多事情,若是我們忽略其中的細節,就會不小心踩到坑。😂😂😂
# 參考連結
- Understanding _dl_runtime_resolve() (opens new window)
- RELRO: RELocation Read-Only (opens new window)
- Hardening ELF binaries using Relocation Read-Only (RELRO) (opens new window)
- Why does gcc link with '-z now' by default, although lazy binding is the default for ld? (opens new window)
# 五、結論
這篇文章我承認自己是覺得還需要再整理,因為動態鏈結機制相對較複雜。後期針對動態鏈接的最佳化論文可能還要去分析一下。那以這張很棒的圖做為結尾😀

- PLT 內每個元素都是跳轉指令,先跳去 GOT 看有沒有函數地址,沒有就跳回來再跳去 PLT 第一項去叫動態鏈接器解析地址更新,有的話直接執行就好,甭跳回來。
- 動態鏈結機制有 prelink 方法可以加速執行時間,但 prelink 跟 ASLR 的關係要再去看論文。
- 動態鏈結跟靜態鏈結各有好處跟壞處。但我認為動態鏈結更加彈性、優點更多。
# 六、參考連結
Why does the PLT exist in addition to the GOT, instead of just using the GOT? (opens new window)
PLT and GOT - the key to code sharing and dynamic libraries (opens new window)
計算機系統篇之鍊接(14):.plt、.plt.got、.got和.got.plt部分之間的區別 (opens new window)
Linux系統中編譯、鏈接的基石-ELF文件:扒開它的層層外衣,從字節碼的粒度來探索 (opens new window)